Running Spark on a Cluster: The Basics
In this short guide, we’ll walk through how to run modest Spark jobs on a cluster. We’ll do this in 2 parts:
- Part 1: (this guide) We’ll cover how to start up a Spark cluster using the Flintrock command-line tool, and we’ll run a simple word count example using the
spark-shell, Spark’s interactive REPL. - Part 2: (the next guide) We’ll connect our Spark job to an S3 bucket, add a simple library dependency, and we’ll develop the job in a normal IDE, using
spark-submitto submit our job and its dependencies to the cluster, without invoking the spark-shell.
We’ll begin with the simple task of spinning up a Spark cluster on Amazon EC2, and running a very simple Spark program from the spark-shell (Spark’s REPL).
To do this, we’ll need Flintrock, a Python-based command-line tool designed to quickly and easily spin up Spark clusters on Amazon Web Services (AWS).
Setting Up Flintrock and Amazon Web Services
Flintrock is a command-line tool that makes it easy to start/pause/tear down Spark clusters, and to otherwise seamlessly interact with your cluster from the command line.
Installing Flintrock
At the time of writing, the most up-to-date version of Flintrock is 0.9.0.
To get the latest release of Flintrock, simply install using pip:
$ pip3 install flintrock
If you would like to use an option other than pip to get Flintrock, see Flintrock’s installation instructions.
Creating a New AWS User for Flintrock
I assume at this point that you’ve created an AWS account.
Take note of the availability zone that your account is set for (top right corner of your AWS console). You will need to ensure that all of your Flintrock configuration is for the same availability zone
In this guide, I am using us-east-1:

We must now create a user that we can use with Flintrock to start and manage a Spark cluster. For the sake of simplicity and reproducability, we’re going to create an almost-root user, which has the rights to do most anything except AWS account administration such as changing billing details.
(In a production scenario, you should obviously further restrict access to individual users.)
To create a new user, simply:
- Go to the AWS console, and in the dropdown or “all services” list, select IAM (which stands for Identity and Access Management).
- On the left panel, select Users.
- Click the blue Add user button.
On the page that appears (add user step 1):
- Provide a username (I chose
sparkuser) - Check the box next to both access types; “Programmatic access” as well as “AWS Management Console access”
- Click the Next: Permissions button.
On the Permissions page (add user step 2):
Select “Add user to group” and click “Create group”. Create a group with the following policy selected:

Add your user to this newly created permissions group, and click the Next: Review button.
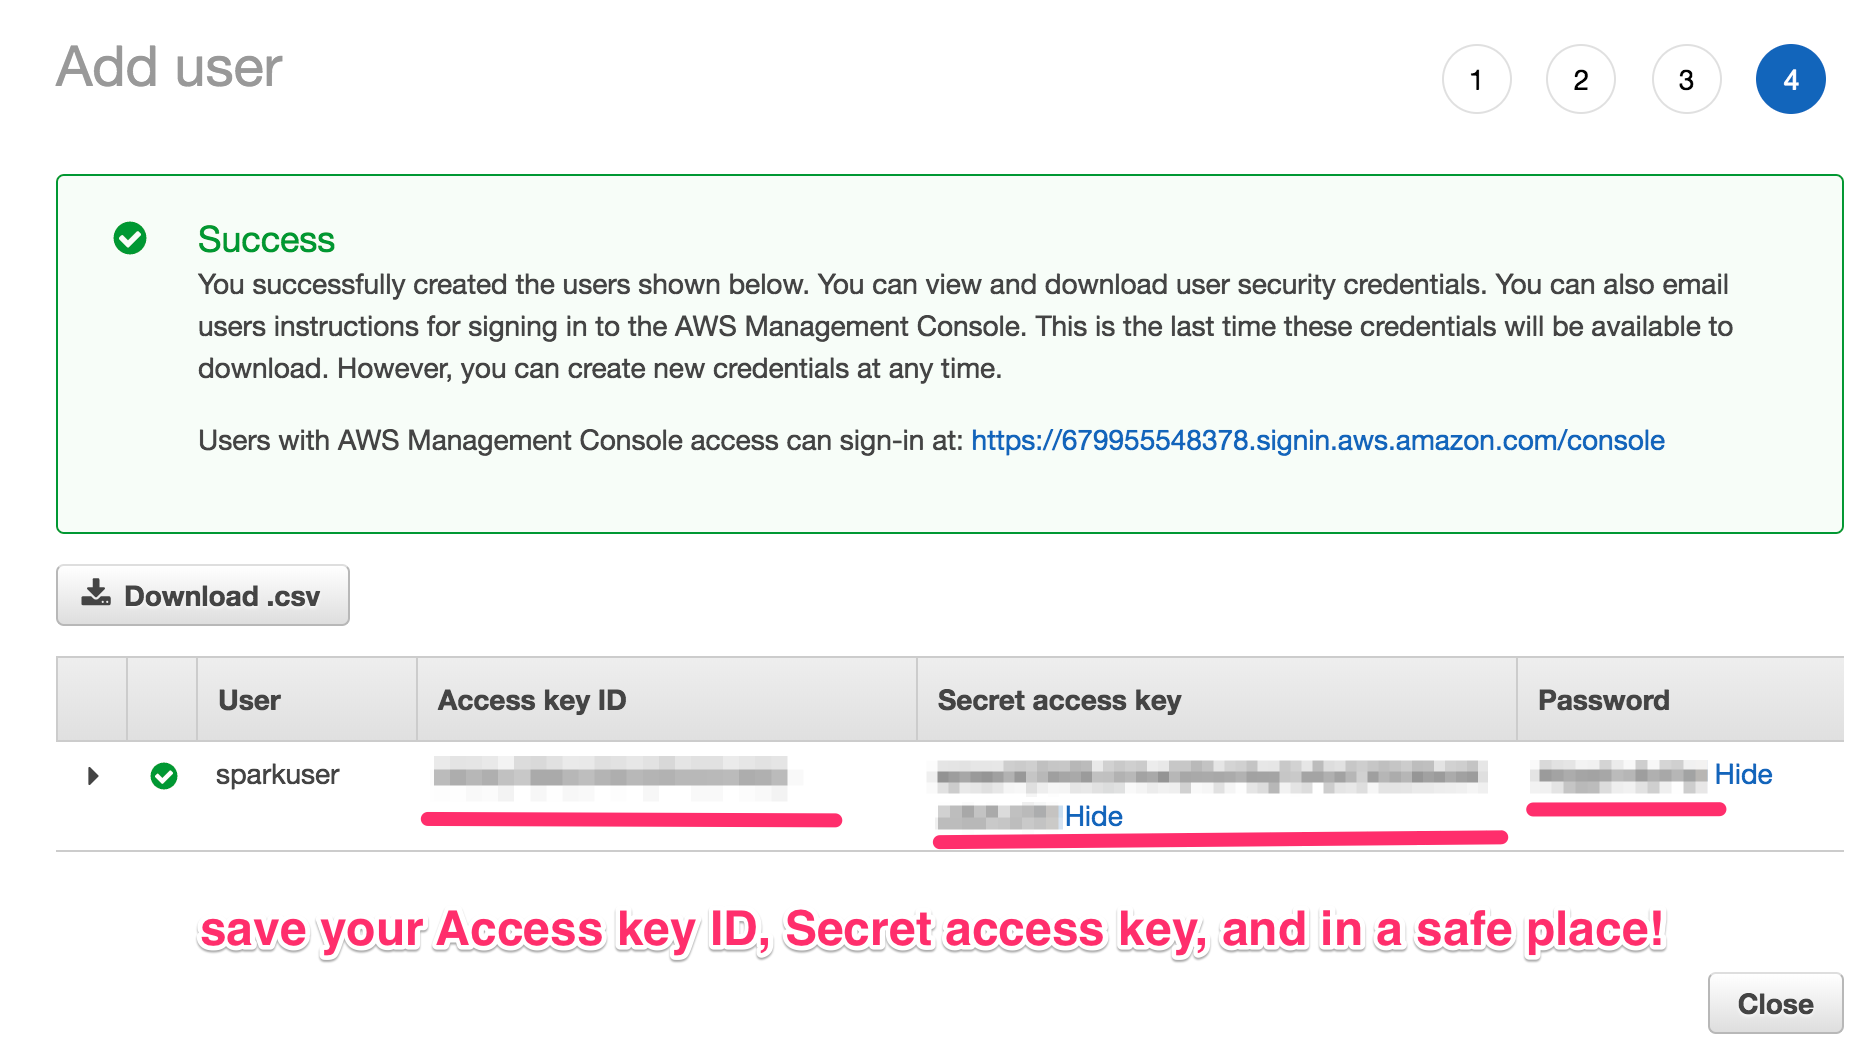
Verify that the user details and permissions summary look correct, and click Create user.
Important next step: save the key ID, secret access key, and password associated with your newly-created user! Either download as a CSV file, or copy/paste the Access Key ID, Secret Access Key, and Password to a safe place.
In order for Flintrock to use your newly-created user’s Access Key ID and Secret Access Key, you’ll need to set the following environment variables so Flintrock can use this user later.
$ export AWS_ACCESS_KEY_ID=xxxxxxxxxxxxxxxxxxxx
$ export AWS_SECRET_ACCESS_KEY=yyyyyyyyyyyyyyyyyyyyyyyyyyyyyyyyyyyyyyyy
Generating EC2 Key Pairs
In order for you to remotely access your EC2 instances, you will need to generate a key pair in order to authenticate.
To generate a key pair for you to use to authenticate, simply:
- Go to the AWS console, and in the dropdown or “all services” list, select EC2.
- On the left panel, under “Network & Security,” select Key Pairs.
- Click the blue Create Key Pair button.
- Name your key pair
spark_cluster, and click Create. - This will start an automatic download of a file called
spark_cluster.pem. - Change the permissions of the .pem file so that only the owner can read it:
$ chmod 400 spark_cluster.pem
Configuring Flintrock with AWS
Now, all we have to do is provide our desired cluster configuration to Flintrock before we can start up our Spark cluster.
To do this, at the command line, just do:
flintrock configure
This will open up your system’s configured text editor with a default
YAML configuration file, called config.yaml.
For my job, I have set the following options:
services:
  spark:
    version: 2.2.0

  hdfs:
    version: 2.7.5

provider: ec2

providers:
  ec2:
    key-name: spark_cluster
    identity-file: /path/to/spark_cluster.pem
    instance-type: m4.large
    region: us-east-1
    ami: ami-97785bed   # Amazon Linux, us-east-1
    user: ec2-user
    tenancy: default  # default | dedicated
    ebs-optimized: no  # yes | no
    instance-initiated-shutdown-behavior: terminate  # terminate | stop

launch:
  num-slaves: 1
  install-hdfs: True
  install-spark: True

debug: false
To explain this selection of options:
key-nameandidentity-fileare simply the .pem file that we generated above.instance-typeis the EC2 instance type you’d like to run. The full pricing list for all instance types per region is available here.regionis the AWS region that we’ve chosen in our account. In my case, I’m usingus-east-1.amiis the Amazon Machine Image (AMI) that we want to use in our cluster. For my region,us-east-1, I’ve simply chosen the latest Linux AMI for my region, which happens to beami-97785bedat the time of writing.useris the username of the non-root user that’s created on each VMnum-slavesis the number of non-master Spark nodes in the cluster. So in selecting 1 slave, that means I’ll have 2 nodes in total; one master, and one worker/slave.install-hdfsshould be set to true if you want to access data in S3.
Starting a Spark Cluster with Flintrock
We now have everything we need setup to spin up a Spark cluster!
To start our cluster, we just have to choose a name for our cluster, e.g.,
my-spark-cluster and do:
$ flintrock launch my-spark-cluster
It should take ~2 minutes to complete. When finished, you should see the following:
$ flintrock launch my-spark-cluster
Launching 2 instances...
[107.21.87.63] SSH online.
[107.21.87.63] Configuring ephemeral storage...
[107.21.87.63] Installing Java 1.8...
[34.234.87.162] SSH online.
[34.234.87.162] Configuring ephemeral storage...
[34.234.87.162] Installing Java 1.8...
[34.234.87.162] Installing HDFS...
[107.21.87.63] Installing HDFS...
[107.21.87.63] Installing Spark...
[34.234.87.162] Installing Spark...
[107.21.87.63] Configuring HDFS master...
[107.21.87.63] Configuring Spark master...
HDFS online.
Spark online.
launch finished in 0:02:53.
Cluster master: ec2-107-21-87-63.compute-1.amazonaws.com
Login with: flintrock login my-spark-cluster
Note: if you get an error saying that Flintrock could not find your AWS
credentials, remember to set your AWS_ACCESS_KEY_ID and
AWS_SECRET_ACCESS_KEY environment variables as specified above.
Now we can login to the master node of our cluster! To do that, just do:
$ flintrock login my-spark-cluster
And you should see something to the effect of:
       __|  __|_  )
       _|  (     /   Amazon Linux AMI
      ___|\___|___|

https://aws.amazon.com/amazon-linux-ami/2017.09-release-notes/
[ec2-user@ip]$
Running a Simple Spark Job From the spark-shell
On the command line of the master node of our cluster (i.e., in the EC2 shell shown above), to launch the spark-shell, just do:
$ spark-shell
After some start-up output, you should eventually see:
Spark context Web UI available at http://ec2-xxxxxxxxxx.compute-1.amazonaws.com:4040
Spark context available as 'sc' (master = local[*], app id = local-1522613551031).
Spark session available as 'spark'.
Welcome to
      ____              __
     / __/__  ___ _____/ /__
    _\ \/ _ \/ _ `/ __/  '_/
   /___/ .__/\_,_/_/ /_/\_\   version 2.2.0
      /_/

Using Scala version 2.11.8 (OpenJDK 64-Bit Server VM, Java 1.8.0_161)
Type in expressions to have them evaluated.
Type :help for more information.

scala>
To run a simple word count example on our Spark cluster, just enter:
val text = List("Hadoop MapReduce, a disk-based big data processing engine, is being replaced by a new generation of memory-based processing frameworks, the most popular of which is Spark.", "Spark supports Scala, Java, Python, and R.")
val rdd = sc.parallelize(text)

val counts = rdd.flatMap(line => line.split(" "))
                .map(word => (word, 1))
                .reduceByKey(_ + _)
counts.collect()
The result should look like:
scala> counts.collect()
res0: Array[(String, Int)] = Array((is,2), (Java,,1), (big,1), (data,1), (new,1), (generation,1), (engine,,1), (Scala,,1), (MapReduce,,1), (Python,,1), (R.,1), (supports,1), (replaced,1), (Spark,1), (frameworks,,1), (memory-based,1), (most,1), (a,2), (popular,1), (disk-based,1), (processing,2), (Spark.,1), (which,1), (of,2), (by,1), (and,1), (being,1), (the,1), (Hadoop,1))
And voilà! You’ve just run a simple Spark job on your own Spark cluster!
To shut down your cluster, just run:
$ flintrock destroy my-spark-cluster