Running Spark on a Cluster: The Basics
In this short guide, we’ll walk through how to run modest Spark jobs on a cluster. We’ll do this in 2 parts:
- Part 1: (the previous guide) We’ll cover how to start up a Spark cluster using the Flintrock command-line tool, and we’ll run a simple word count example using the
spark-shell, Spark’s interactive REPL. - Part 2: (this guide) We’ll connect our Spark job to an S3 bucket, add a simple library dependency, and we’ll develop the job in a normal IDE, using
spark-submitto submit our job and its dependencies to the cluster, without invoking the spark-shell.
In this guide, we assume you’re developing a Spark application in your regular development environment and that when ready, you’d simply like to submit that job to be run on a Spark cluster running on EC2.
To do this, we need a variety of tools:
- Spark pre-built for Apache Hadoop. Spark comes with a script called
spark-submitwhich we will be using to submit our job to the cluster. - Scala and sbt.
- Flintrock. A command-line tool for launching Spark clusters. See part 1 for this.
- A running cluster started with Flintrock. See part 1 for this.
Given these tools, our general workflow is as follows:
- Develop locally.
- When ready to deploy, compile, package up jars to send to cluster.
- Copy jars to master and worker nodes using Flintrock.
- Use
spark-submitscript to start job. - Check Spark web UI to see output (stdout/stderr).
Downloading Spark
Head over to https://spark.apache.org/downloads.html. (At the time of writing, Spark 2.2.0 will offer the smoothest set-up experience.)
Simply select the 2.2.0 release of Spark, ensure that the “pre-built for Apache Hadoop 2.7 and later” option is selected, and simply download Spark 2.2.0, pre-built for Apache Hadoop 2.7 and later.
Reasons to use Flintrock over AWS’s Elastic Map Reduce (EMR); with Flintrock, it’s easier to pause a running cluster or do a number of Spark-specific cluster tasks directly from the command-line.
Once downloaded, unzip, and cd into the spark-2.2.0-bin-hadoop2.7 directory. To ensure everything works as expected, simply do:
$ ./bin/spark-submit --help
And you should see the following:
$ ./bin/spark-submit --help
Usage: spark-submit [options] <app jar | python file> [app arguments]
Usage: spark-submit --kill [submission ID] --master [spark://...]
Usage: spark-submit --status [submission ID] --master [spark://...]
Usage: spark-submit run-example [options] example-class [example args]

Options:
  --master MASTER_URL         spark://host:port, mesos://host:port, yarn, or local.
  --deploy-mode DEPLOY_MODE   Whether to launch the driver program locally ("client") or
                              on one of the worker machines inside the cluster ("cluster")
                              (Default: client).
  --class CLASS_NAME          Your applications main class (for Java / Scala apps).
  --name NAME                 A name of your application.
  --jars JARS                 Comma-separated list of local jars to include on the driver
                              and executor classpaths.
Simple Spark Project
We assume you will be developing in Scala with sbt. To keep things simple and as reproducible as possiible, I will be working with the following simple Spark project.
The project consists of only three files; build.sbt, build.properties, and our actual Spark application, DemoDeploy.scala. It’s laid out as follows:
├── build.sbt
├── project
│   └── build.properties
└── src
    └── main
        └── scala
            └── DemoDeploy.scala
Our build.sbt is as simple as possible. For now, we include only Spark as a dependency:
scalaVersion := "2.11.9"

name := "simple-spark-deploy"
version := "0.1"

val sparkVersion = "2.2.0"

libraryDependencies ++= Seq (
  "org.apache.spark" %% "spark-core" % "2.2.0"
)
Our build.properties simply indicates which version of sbt we’ll be using. For this project, I’ve been using 0.13.16:
sbt.version=0.13.16
And finally, our simple Spark program is as follows:
package demodeploy

import org.apache.spark.SparkConf
import org.apache.spark.SparkContext
import org.apache.spark.SparkContext._

import org.apache.spark.rdd.RDD

object DemoDeploy {
  def main(args: Array[String]) {

    val conf = new SparkConf().setAppName("DemoDeploy")
    val sc = new SparkContext(conf)

    println("====DEMO DEPLOY====")

    val text = List("Hadoop MapReduce, a disk-based big data processing engine, is being replaced by a new generation of memory-based processing frameworks, the most popular of which is Spark.", "Spark supports Scala, Java, Python, and R.")
    val rdd = sc.parallelize(text)

    val counts = rdd.flatMap(line => line.split(" "))
                    .map(word => (word, 1))
                    .reduceByKey(_ + _)
                    .collect()

    counts foreach println

    sc.stop()
  }
}
Here, we do word count on an RDD[String], we collect the result as an array of
pairs at the master node, and we print each element.
Deploying Our Simple Spark Project
To deploy this job on our running cluster from part 1, we’ve first got to package it up up as a jar to send to the master/worker nodes in our cluster.
Packaging Our Job
Most of the time, it’s sufficient to use the package task that comes built-in
with sbt to assmble a jar that you can ship to your cluster nodes.
To do that, just cd into your project’s root directory, and run sbt package.
$ sbt package
[info] Loading global plugins from /Users/hmiller/.sbt/0.13/plugins
[info] Loading project definition from /Users/hmiller/Dropbox/git-shared/simple-spark-deploy/project
...
[info] Compiling 1 Scala source to /Users/hmiller/Dropbox/git-shared/simple-spark-deploy/target/scala-2.11/classes...
[info] Packaging /Users/hmiller/Dropbox/git-shared/simple-spark-deploy/target/scala-2.11/simple-spark-deploy_2.11-0.1.jar ...
[info] Done packaging.
[success] Total time: 12 s, completed Apr 2, 2018 9:44:30 AM
Take note of the name and location of the packaged jar,
/Users/hmiller/Dropbox/git-shared/simple-spark-deploy/target/scala-2.11/simple-spark-deploy_2.11-0.1.jar
in this case.
Moving Our jar to the Cluster
In order for our Spark cluster to run our newly-packaged application, we simply
have to copy it over to the master and worker nodes in the Spark cluster (named
my-spark-cluster) we started in part 1.
To do that, we use Flintrock’s copy-file command, which takes 3 arguments.
$ flintrock copy-file [cluster-name] [path-to-local-jar] [path-to-remote-destination-of-jar]
Since the user we created on our Spark cluster was called ec2-user, the remote
directory we must copy our packaged jar to is simply /home/ec2-user.
So in this case, to copy our newly-packaged jar to the master and worker nodes
in my-spark-cluster, we just run:
flintrock copy-file my-spark-cluster \
  /Users/hmiller/Dropbox/git-shared/simple-spark-deploy/target/scala-2.11/simple-spark-deploy_2.11-0.1.jar \
  /home/ec2-user/
If you’d like to login to your master node and double-check that your jar is where it should be, or for any other sort of debugging on the master node, you can use Flintrock for this too. Simply do:
$ flintrock login my-spark-cluster
This sshes you into your my-spark-cluster’s master node, in your user’s home directory. E.g.,:
[ec2-user@ip-172-31-26-137 ~]$ pwd
/home/ec2-user
Submitting with spark-submit
Finally, to actually run our job on our cluster, we must use the spark-submit
script that comes with Spark.
We’ll need a few pieces of information to do the most minimal submit possible. Those include:
- the entry point for your Spark application, i.e., the class where your main method resides.
- the URL of the master node of your cluster. Note: we can use Flintrock to get this!
- the name and path of your application jar that resides on your cluster nodes
The entry point of our Spark application is simply demodeploy.DemoDeploy,
since DemoDeploy.scala contains the main method of our application.
To obtain the URL of the master node of our cluster, we use Flintrock.
Flintrock’s describe command provides basic information such as URLs about the
cluster(s) you have running.
$ flintrock describe
Found 1 cluster in region us-east-1.
---
my-spark-cluster:
  state: running
  node-count: 2
  master: ec2-107-21-87-63.compute-1.amazonaws.com
  slaves:
    - ec2-34-234-87-162.compute-1.amazonaws.com
Thus, in this case, our master node’s URL is
ec2-107-21-87-63.compute-1.amazonaws.com. Since we’re running our Spark
cluster in standalone mode, the URL we must pass to spark-submit will look
like: spark://ec2-107-21-87-63.compute-1.amazonaws.com:7077. Here, spark://
indicates that we’re running in Spark standalone mode, and 7077 is the default
port that the master node is configured to use in standalone mode.
Finally, recall that we copied our application jar to the /home/ec2-user/
folder on our master and worker nodes, and that the jar is called
simple-spark-deploy_2.11-0.1.jar.
We can submit our job to Spark using spark-submit as follows:
$ ./bin/spark-submit \
  --class demodeploy.DemoDeploy \
  --master spark://ec2-107-21-87-63.compute-1.amazonaws.com:7077 \
  --deploy-mode cluster \
  /home/ec2-user/simple-spark-deploy_2.11-0.1.jar
Note that the you can think of the --deploy-mode cluster option as essentially
a directive to Spark that you’re submitting your job from your laptop to a
faraway cluster. That is, you’re sending the job to another machine that
should act as the master, and that the output from the job should be printed to
that machine’s stdout/stderr.
Seeing the Results
To see the result of your job, simply point your browser to your master’s URL with port 8080 appended to the URL. For example, http://ec2-107-21-87-63.compute-1.amazonaws.com:8080
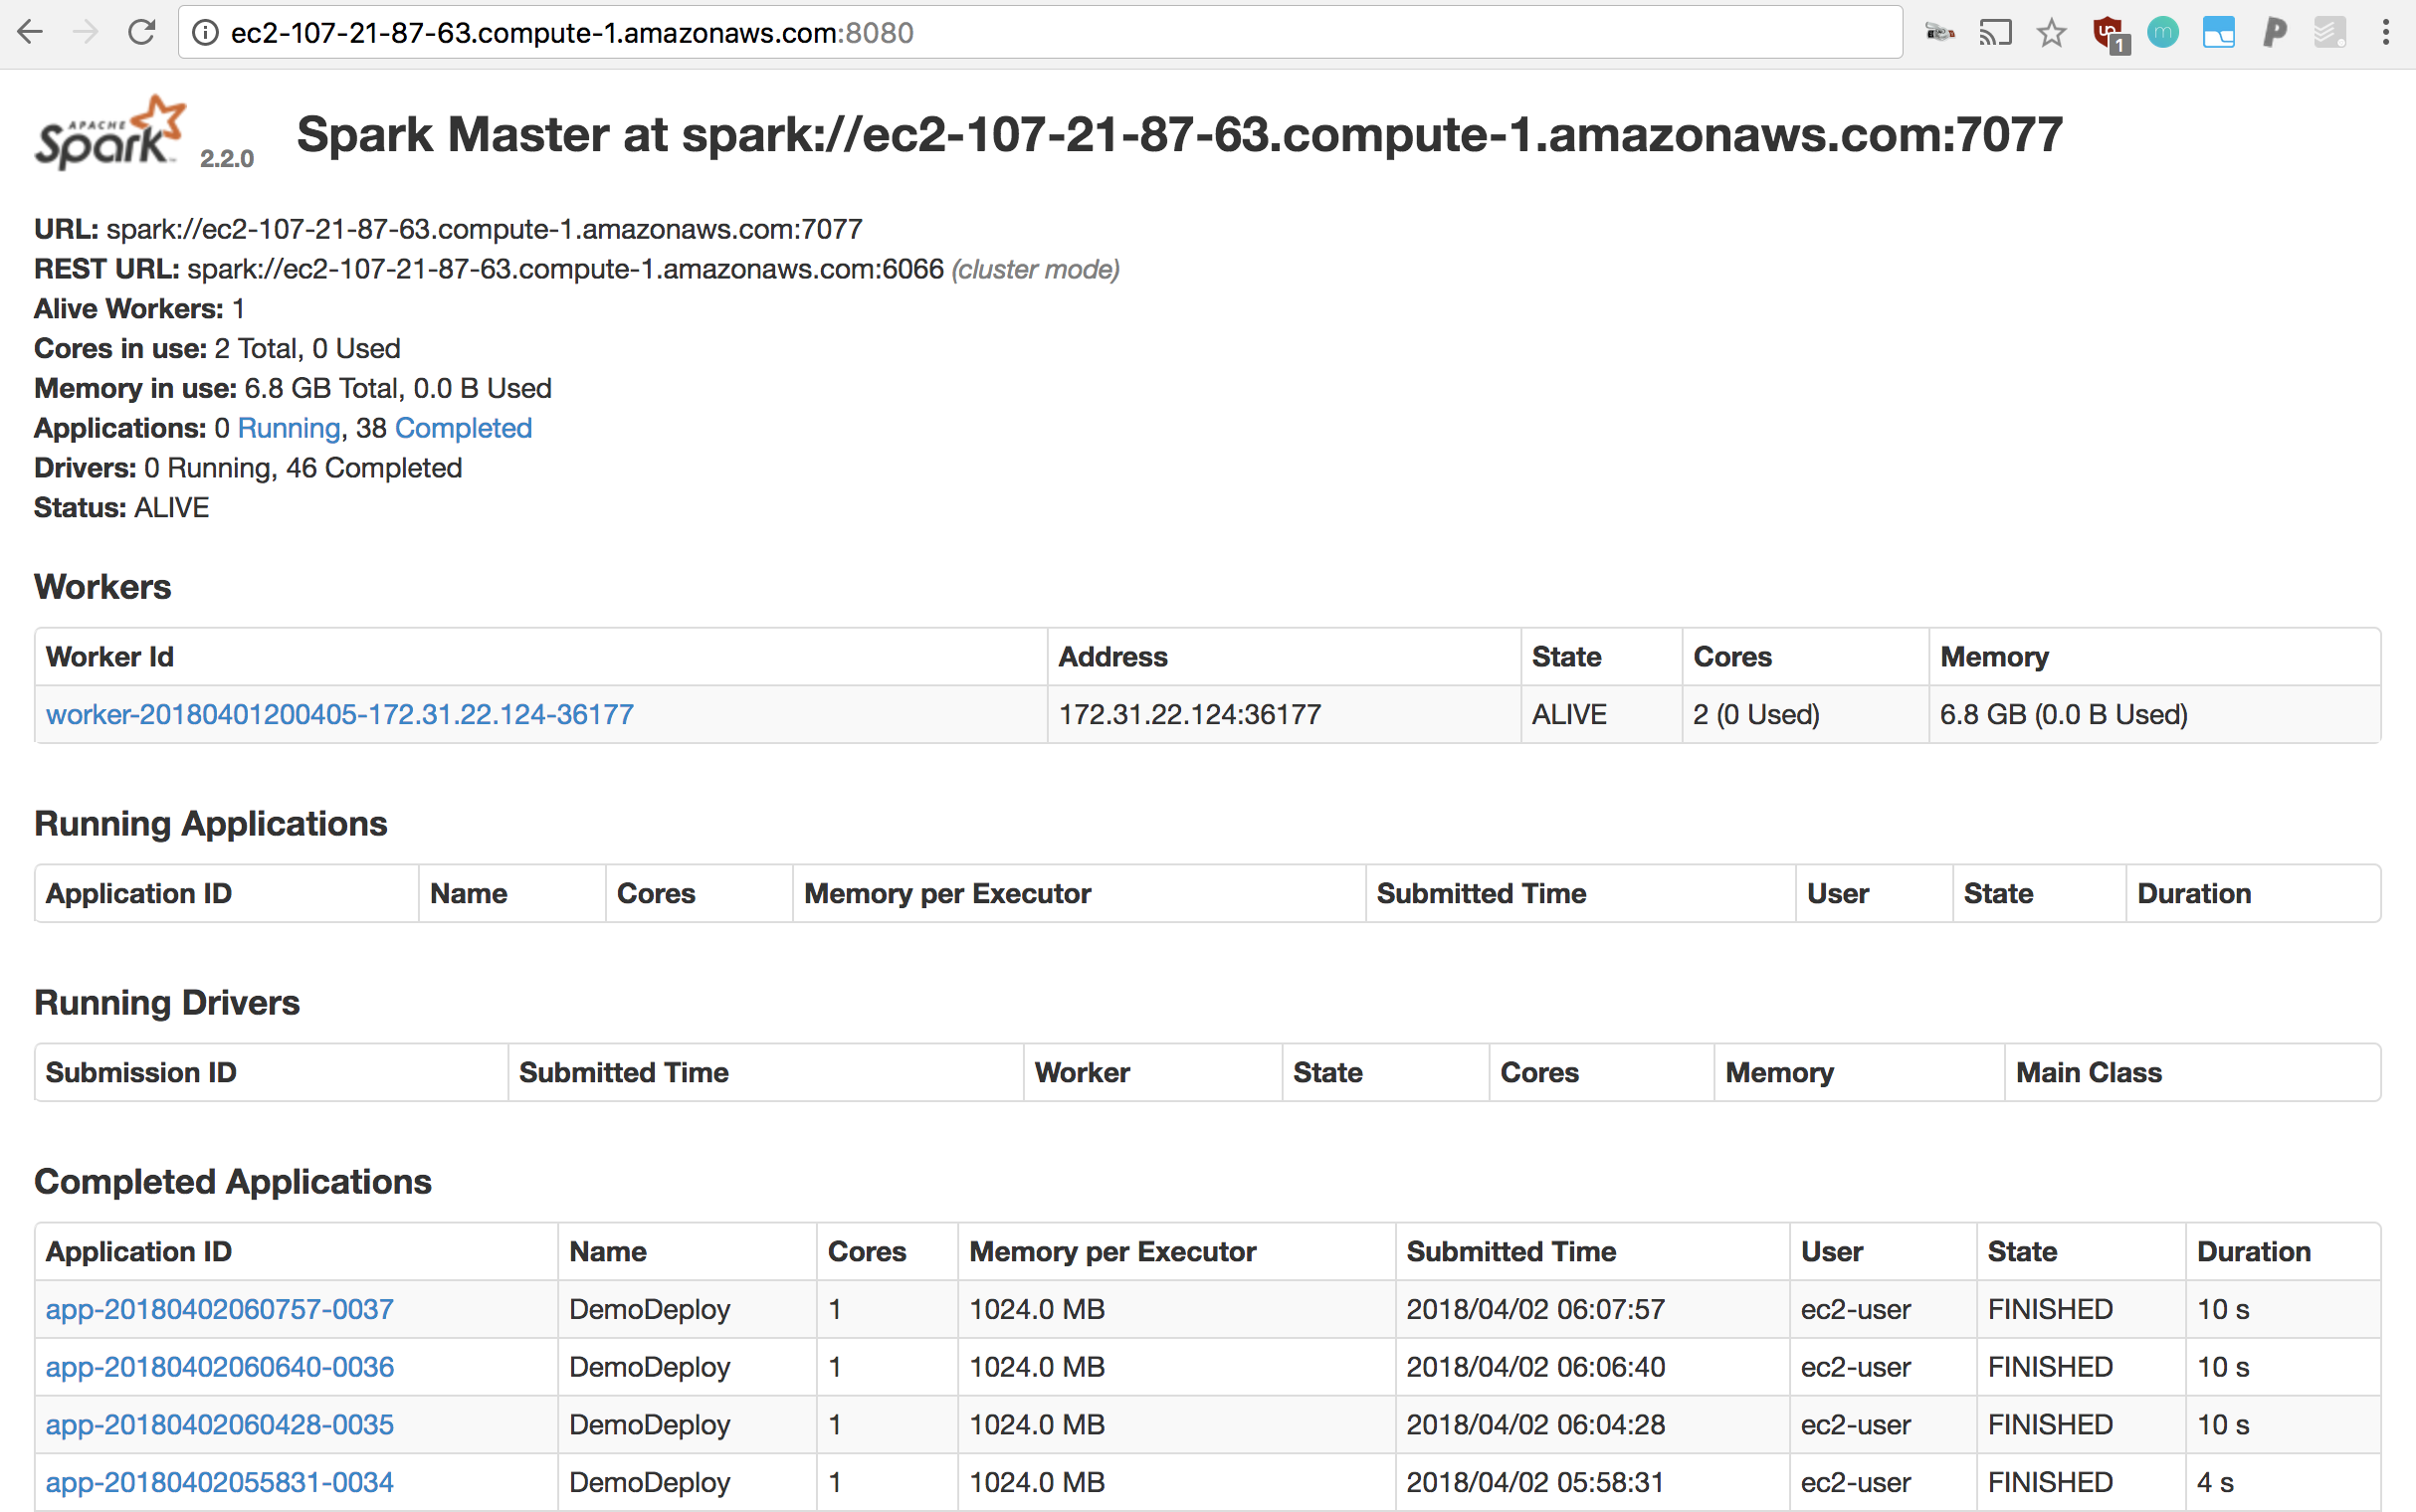
If your job is long-running, refreshing this page should allow you to see it under “Running Applications”.
Else, completed jobs can be inspected under “Completed Drivers”.

There, you can see the list of jobs that have finished, failed, errored, etc, and you can click each one to inspect its stdout and stderr (scroll down to see the stdout/stderr for each driver!, under “Finished Drivers”)
For example:
Adding Dependencies
Most of the time, adding dependencies and ensuring that they’re available on
each cluster node is possible by simply using sbt’s package task.
As an example, let’s add and use two libraries to our project; breeze, an NLP/linear algebra library, and spire, a mathematical library.
We must simply update our build.sbt file’s dependencies as follows:
libraryDependencies ++= Seq (
  "org.apache.spark" %% "spark-core" % "2.2.0",

  "org.scalanlp" %% "breeze" % "0.13.2", // nlp/linear algebra library, example dependency
  "org.typelevel" %% "spire" % "0.14.1" // mathematical library, example dependency
)
And in DemoDeploy.scala, we must simply add appropriate imports and use the imported methods. For example:
package demodeploy

import breeze.linalg._
import spire.implicits._
import spire.math._

import org.apache.spark.SparkConf
import org.apache.spark.SparkContext
import org.apache.spark.SparkContext._

import org.apache.spark.rdd.RDD

object DemoDeploy {
  def main(args: Array[String]) {

    val conf = new SparkConf().setAppName("DemoDeploy")
    val sc = new SparkContext(conf)

    println("====DEMO DEPLOY====")

    println("OUTPUT OF BREEZE LIBRARY:")
    println(DenseVector.zeros[Double](5))
    println("OUTPUT OF SPIRE:")
    println(Complex(3.0, 5.0).sin)

    val text = List("Hadoop MapReduce, a disk-based big data processing engine, is being replaced by a new generation of memory-based processing frameworks, the most popular of which is Spark.", "Spark supports Scala, Java, Python, and R.")
    val rdd = sc.parallelize(text)

    val counts = rdd.flatMap(line => line.split(" "))
                    .map(word => (word, 1))
                    .reduceByKey(_ + _)
                    .collect()

    counts foreach println

    sc.stop()
  }
}
To run this on our Spark cluster, we simply repeat the steps from above, namely:
- run sbt package to package up a jar to send to the cluster.
- copy the packaged jar to the cluster nodes using Flintrock.
- run
spark-submitas configured above.
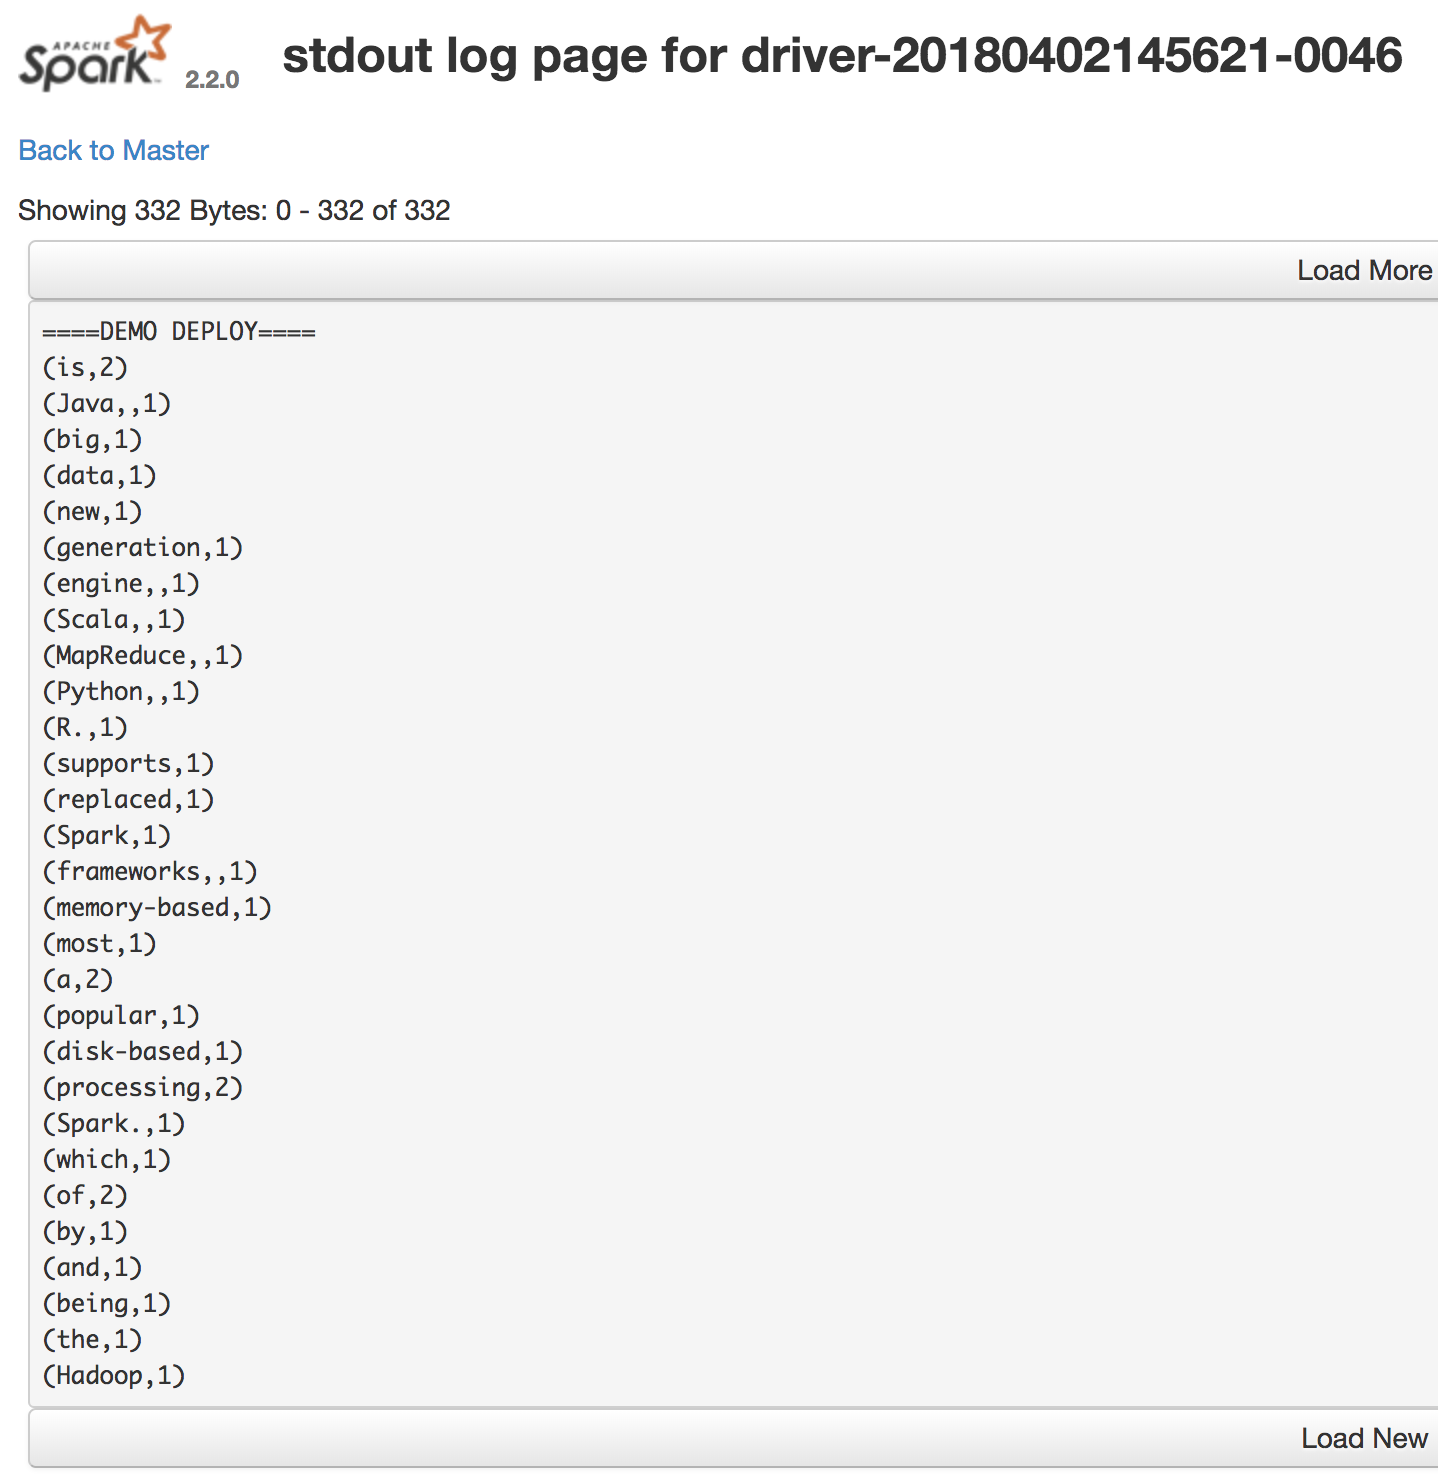
In the Spark UI, you should be able to see the following output for that driver’s stdout:
Connecting to S3
Getting Data on S3
In order to get data onto S3, you may either use the AWS command-line tools, or S3’s UI in the AWS console. We’ll be using the command-line interface.
To start, first grab awscli, which you can get using Python’s pip:
$ pip install awscli
(This assumes that you have your AWS environment variables properly set, as explained in part 1)
Once installed, create a bucket as follows (we will call ours
simple-spark-deploy-bucket):
$ aws s3 mb s3://simple-spark-deploy-bucket
We can upload a file (rock-and-roll-wiki.txt) to our bucket as follows:
aws s3 cp ./rock-and-roll-wiki.txt s3://simple-spark-deploy-bucket
Using That Data From Your Spark Job
Now, let’s say we’d like to use this text file in our S3 bucket as our input in the word count example we’ve been working with.
To do so, we must simply add the following line to DemoDeploy.scala:
val rdd = sc.textFile("s3a://simple-spark-deploy-bucket/rock-and-roll-wiki.txt")
Notice that we are using s3a rather than s3/s3n. This is because s3a is known to have better performance, and to be the successor to s3n.
Our full DemoDeploy.scala should then look like:
package demodeploy

import breeze.linalg._
import spire.implicits._
import spire.math._

import org.apache.spark.SparkConf
import org.apache.spark.SparkContext
import org.apache.spark.SparkContext._

import org.apache.spark.rdd.RDD

object DemoDeploy {
  def main(args: Array[String]) {

    val conf = new SparkConf().setAppName("DemoDeploy")
    val sc = new SparkContext(conf)

    println("====DEMO DEPLOY====")

    println("OUTPUT OF BREEZE LIBRARY:")
    println(DenseVector.zeros[Double](5))
    println("OUTPUT OF SPIRE:")
    println(Complex(3.0, 5.0).sin)

    val rdd = sc.textFile("s3a://simple-spark-deploy-bucket/rock-and-roll-wiki.txt")

    val counts = rdd.flatMap(line => line.split(" "))
                    .map(word => (word, 1))
                    .reduceByKey(_ + _)
                    .collect()

    counts foreach println

    sc.stop()
  }
}
IMPORTANT!: Before we can go any further, we need to ensure that a handful of specific dependencies for S3 are available on our Spark cluster. As of the time of writing, this is a workaround, which can be solved by downloading a recent Hadoop 2.7.x distribution and a specific, older version of an AWS JAR (1.7.4) that is typically not available in the EC2 Maven Repository.
To do this, simply download the following two jars somewhere on your local machine:
And then, using Flintrock, copy them to the /home/ec2-user/spark/jars directory. This will ensure that these dependencies are available to Spark:
$ flintrock copy-file my-spark-cluster \
  /path/to/aws-java-sdk-1.7.4.jar \
  /home/ec2-user/spark/jars/

$ flintrock copy-file my-spark-cluster \
  /path/to/hadoop-aws-2.7.2.jar \
  /home/ec2-user/spark/jars/
To run this on our Spark cluster, we simply repeat the steps from above, namely:
- run sbt package to package up a jar to send to the cluster.
- copy the packaged jar to the cluster nodes using Flintrock.
- run
spark-submitas configured above.
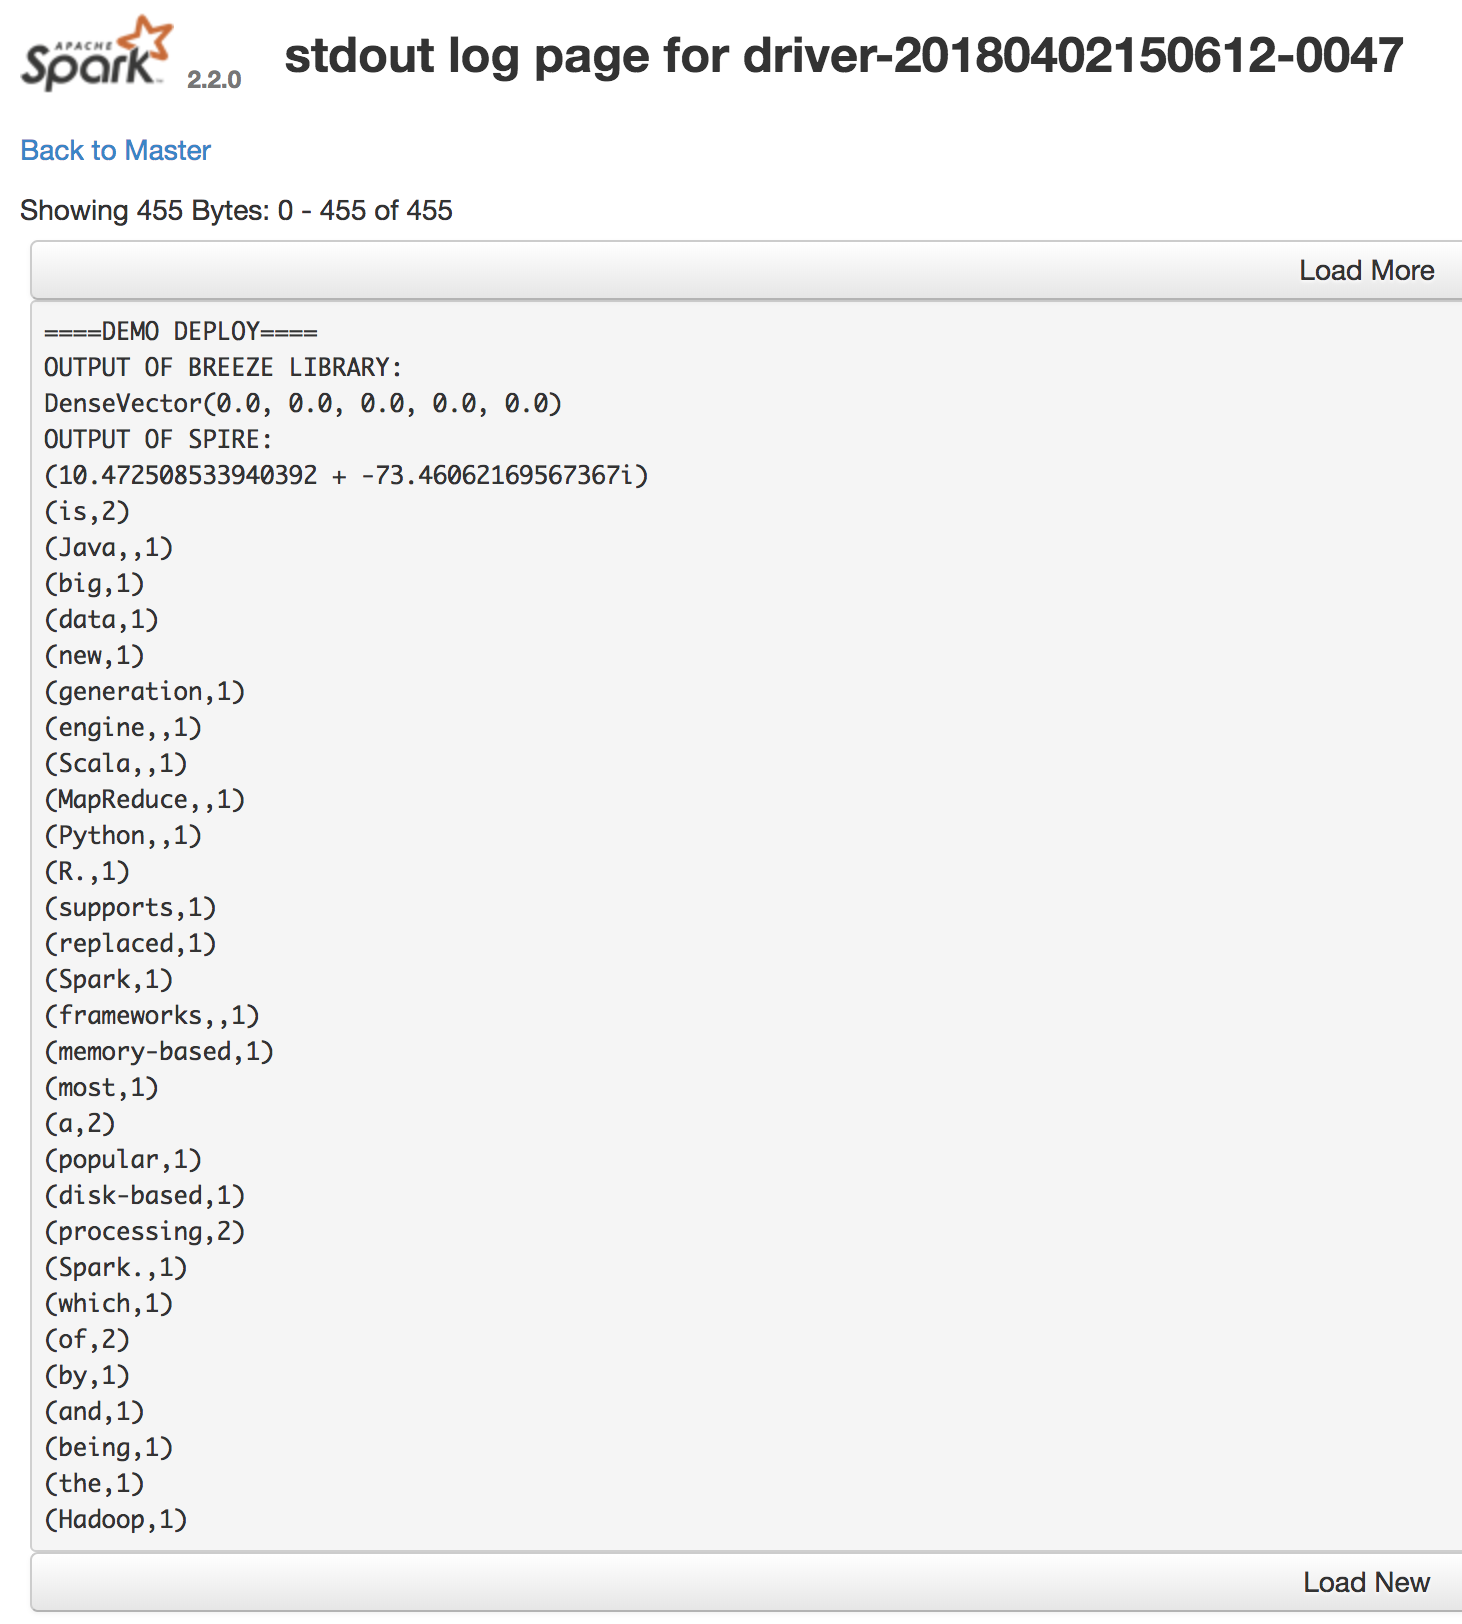
In the Spark UI, you should be able to see the following output for that driver’s stdout:

Et voilà! Now you know how to submit Spark jobs to a running Spark cluster using Flintrock, how to add dependencies to your Spark job, and how to connect your Spark job to an S3 bucket